


Imagine you're on a hike in Yellowstone National Park. You decide to veer off the path to find this epic, secluded hot spring your buddy told you about. You uncover that hot spring, then suddenly realize…
"I don't know where the heck I am!"
Believe it or not, this situation is all too common. Getting lost is easy, especially when you're stepping foot in a park for the first time.
Thankfully, you can prevent a navigation emergency with a simple, affordable tool: a compass.
In this article, I'll walk you through every step of using a compass. From calibrating, to finding yourself on a map, to choosing a compass, you'll be an expert by the end of this post.
Let's get started!
Why Do You Need A Compass?
Although it might seem outdated, a compass is the best all-around navigation tool money can buy. There are a few reasons why it's one of the ten essentials.
No matter where you are in the world, a compass can point you in the right direction. On top of that, a compass works independently of anything else. You don't need a map to operate a compass, and you don't even need any batteries.
This is vital in emergencies, where you could be stuck without a phone charger for hours (or even days) at a time. With your trusty compass in hand, you can get where you need to go in any situation.
Despite that, a compass might seem challenging to use at first glance. We're all so used to the ease of our iPhone's GPS. It tells us exactly where to turn, so anything beyond that looks like a challenge.
Never fear, Wilderness Times is here, and in this article, I'll show you how to use a compass (even if you've never touched one before).
Anatomy Of A Compass
For this part, I'll be using my Suunto M-3 compass to show you around. The reason for that is that I own this compass, and it's relatively straightforward.
It mimics most compasses you'll find at your local outdoor store, and yes, it's likely you'll find this exact compass there. It's also sold at REI.
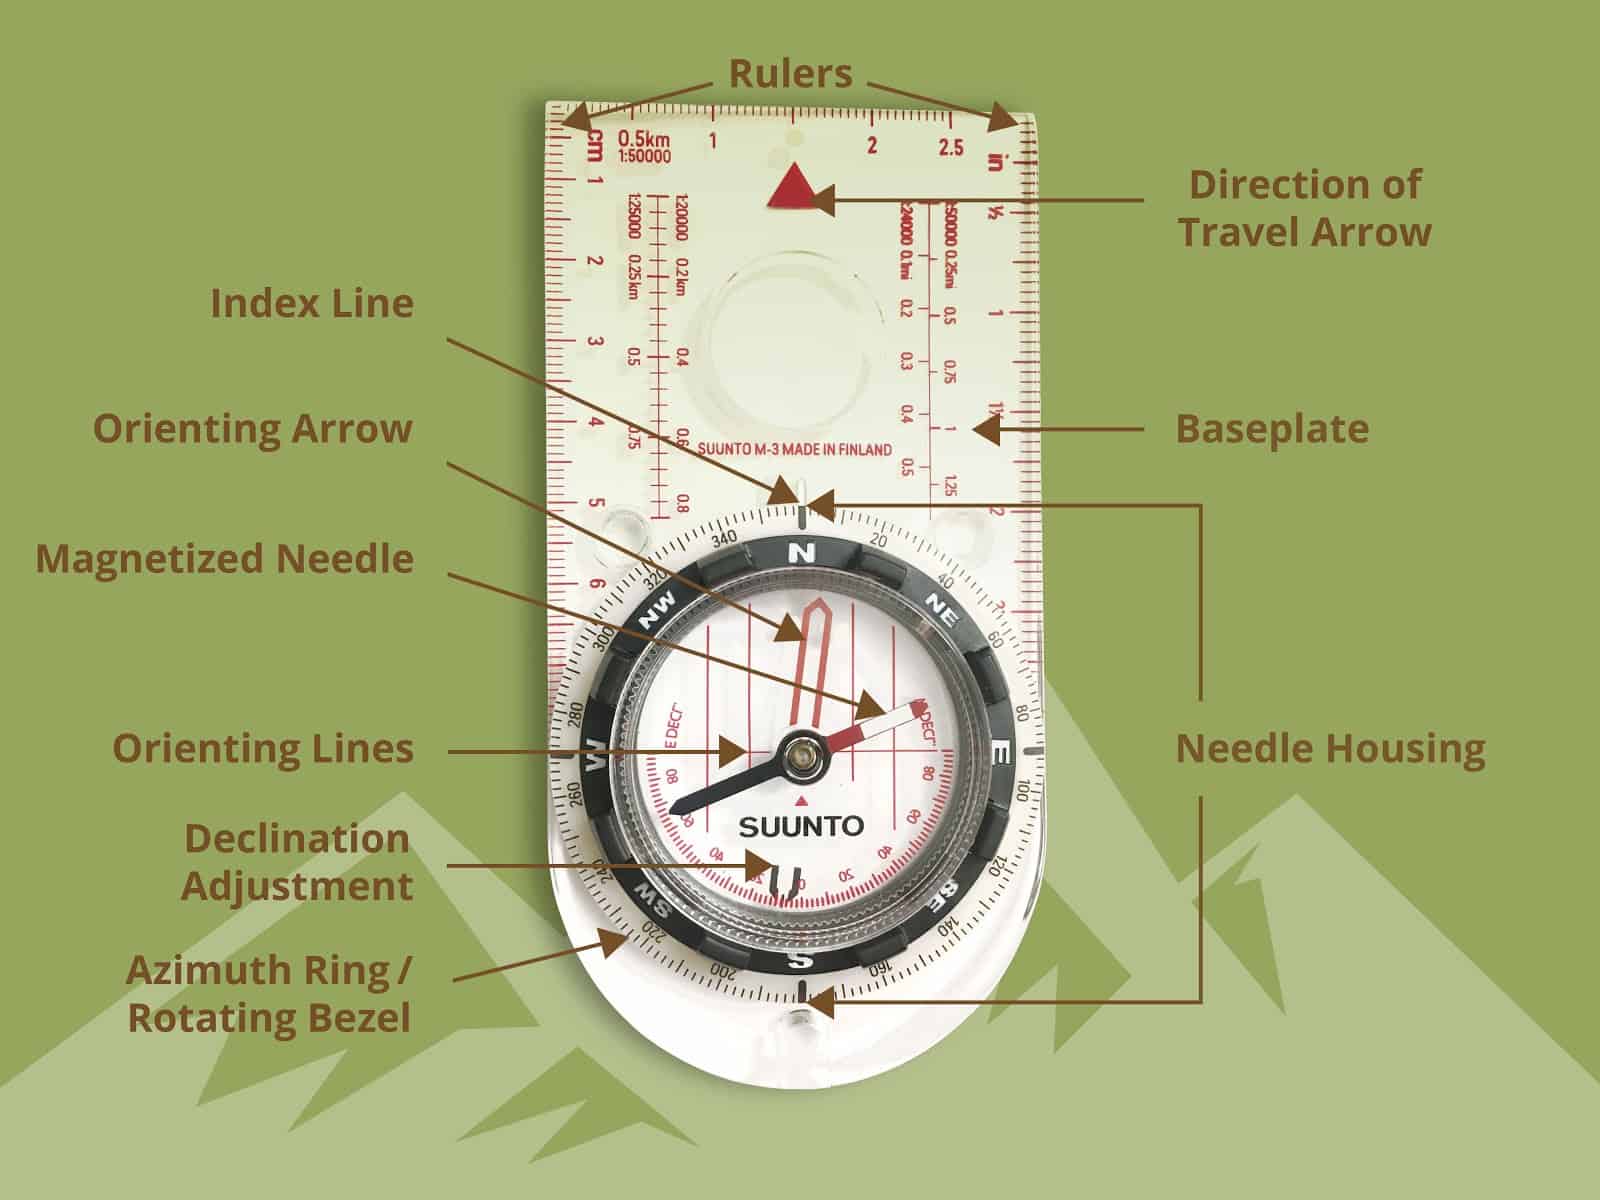
Index Line – This line is fixed and serves to show you the angle of your bearing. It also lets you confirm your declination when you adjust for the difference between true north (or geographic north) and magnetic north.
Orienting Arrow – This is the arrow you want to put the needle into, also known as "red in the shed." When your compass needle is in the orienting arrow, your direction is aligned to north.
Magnetized Needle – Points to magnetic north. Usually, the red side points north.
Orienting Lines – Multiple lines give you the power to align your compass with map grid lines to nail down your direction.
Declination Adjustment – On this compass, the declination adjustment is always shown inside the azimuth ring. This means you can confirm that your declination is adjusted at all times.
Rotating Bezel (A.K.A. Azimuth Ring) – The rotating bezel allows you to change the direction-of-travel arrow so that you know which direction you're trying to head. Its 360 degrees give you fine-tuning for your route.
Ruler – Rulers allow you to measure distances on your map. This compass comes with scaled rulers that line up to maps for easy calculations.
Direction-of-Travel Arrow – Otherwise known as just the direction arrow. Once you set your compass for your bearings, this arrow will point you in the direction you're trying to travel.
Base Plate – The clear base is clear so that you can see your map, and line up the rulers to the gridlines. It's also got straight sides so that you can use it as a ruler to draw lines.
Needle Housing (A.K.A Compass Housing) – The heart of your compass – the area that holds your needle.
Cardinal Points – The Core Of Your Compass
Before we dive into the specifics of operating a compass, let's briefly review the fundamentals. Namely, the cardinal points.
"Cardinal points" is a blanket term used to describe north, south, east, and west.
In between the cardinal points are the intercardinal points – also known as north-east, south-east, south-west, and north-west.
And, in between the intercardinal points are the secondary intercardinal points. These are known as north-northeast…
OK, you get the point. We could split up the cardinal directions a hundred different ways, but the names would get confusing real fast.
Degrees With Ease
Instead of depending on cardinal points to point us in the right direction, you can use degrees. A full circle has 360 degrees. Similarly, your compass has 360 degrees (since it's a circle).
Marking north as zero degrees makes this process much simpler. Instead of heading towards north-east, you can walk towards 45 degrees. So much easier!
Quick vocabulary lesson. "Due" is used to describe an exact cardinal direction.
"Due north" means exactly north or zero degrees. And "due east" signifies (you guessed it) exactly east or 90 degrees.
This is a convenient slang term that you might hear out in the field. "Due east" is much more specific than "east."
Compass vs. Sun
At this point, you might be thinking, "why do I need a compass, when I can just look at where the sun is?"
Experienced outdoorsmen know that "the sun rises in the East, and sets in the West."
However, this is a broad generalization. Due to the spin of the earth, the sun only sets due east two days a year – on the fall and spring equinoxes. Every other day of the year, the sun rises and sets north or south of due east or west.
But, do you know what doesn't change with the seasons? That's right – magnetic north! Because a compass works off magnetism, and not the sun, its direction is in tune all year round. Also, a compass works at night. If you get lost when the sun goes down, you're out of luck, my friend.
Overall, it's much more reliable to go off a compass than the sun.
Types of Compasses
Before we get into using your compass, let's review the types of compasses available today.
The bad news is that there are thousands of options out there (from nautical to aerospace to surveying applications). The good news is that if you head to your local outdoors store, they'll usually only carry compasses meant to be used outdoors.
There are a few types of compasses you may encounter, so here are some details on each.
Baseplate Compass
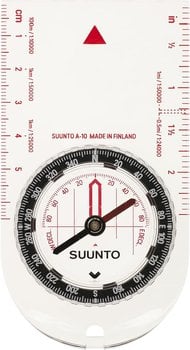
The most widely used outdoor compass is the baseplate compass. This style is named for the plate at the base (duh) and uses a magnetic needle to point north.
Baseplate compasses like the Suunto A-10 (pictured above) are preferred by hikers like me. That's because they're easy-to-use, reliable, and packed with features. Most importantly, they're lightweight and don't take up much space at all. Since there are few parts, they're hard to break, and will rarely fail in the field.
I use a baseplate compass, and you should use one too.
Sighting Compass
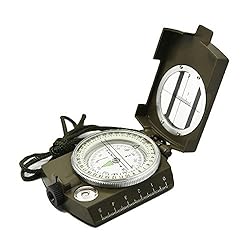
Also known as a lensatic compass, these are like baseplate compasses but with an added sighting glass (like this Ueasy compass). These have made a resurgence lately thanks to their popularity among veterans and preppers.
On the inside, you'll find a compass much like a baseplate compass. What sets these compasses apart is that they come with a mirror or a viewer that allows you to set more precise bearings.
By looking through the viewer, you can better identify your target, destination, or basecamp before you get your bearings. This is useful in military applications where the precision of your bearing can mean life or death.
However, I've found these to be overkill for most outdoors uses. Baseplate compasses might be a little less precise, but they're lighter, more affordable, and easier to use.
Thumb Compass
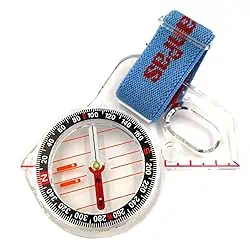
When you're in a crunch for time, it's hard to pull out your compass, use both hands, and find your bearings. Orienteering or other outdoor competitors need to be able to find north fast. That's where the thumb compass comes in.
Popular in Europe, this orienteering compass is a stripped-down baseplate compass that's about half the size of a regular compass. It's stripped-down of all the bells and whistles of a premium compass. This allows it to be small enough to loop on your thumb.
Although light and simple, these can be a bit confusing for beginners. I recommend you start with a baseplate compass to get your bearings (pun intended) and graduate to a thumb compass if you really need it.
Compass Basics
Now that you know your way around a compass, let's get into the basics of compass operation.
Needle Calibration
First things first – the needle always faces north. The first question I usually get is, "which end of the needle faces north?!" 99% of the time, the needle's red end points north.
Thankfully, you can double-check which end aims north with this simple test.
To start, go outside around noon. Face the sun. If you're north of the equator, you should be facing due south. Therefore, the needle end pointing at you is north. The opposite is correct if you're in the Southern hemisphere.
Where Am I Facing?
Great, you know which end of your needle points north. Now, how do you determine where you're facing?
Remember, the needle does not point where you're going. It only looks north.
To find out which direction you're heading, make sure you put "red in the shed." Most compasses come with red lines to designate north (or zero degrees). Once you align the needle with north, you can look at which direction you're facing by reading the azimuth ring.
Cool Compass Tips
Finally, here are some little useful tips that might help you along your journey.
- Hold your compass level with the ground. Tilting the compass at any angle could make the needle swing or sit incorrectly, showing you the wrong angle. Keeping it flat allows the needle to turn freely, giving you greater precision and faster bearings.
- Watch for metal objects. If you're using a magnetic compass (which you probably are), you should consider any metal your compass could interact with. Zippers, tools, jewelry, or any metal on your body could pull the needle, giving you an incorrect compass reading. Fix this by removing the metals, or stretching your hands out so the compass can breathe.
- It's okay to practice. There's nothing wrong with not being able to use a compass (that's why you're reading this article, right?). Instead of breaking in your compass in the wild, try it around the house. Get your bearings, set declination, and navigate on a map while sitting at the kitchen table. This practice will go a long way when you're out in nature.
Calibrating For Declination
Unfortunately, it's time to get technical and change your declination.
Adjusting for declination is a pro-topic that will really help you out in the wild. It might seem difficult at first, but with a little practice, you'll have this down in no time.
But first, pop quiz! Does your compass point to true north or magnetic north?
If you answered magnetic north, you're correct. Magnetic north is where magnetic compasses face, while true north is what shows as north on a map.
Hmmm…if maps are drawn off true north, and your compass points to magnetic north, aren't you going to head in the wrong direction?
Yep. That's where declination adjustment comes into play. Adjusting your compass to true north allows you to use magnetic north on your compass, but translate it into true north.
Depending on where you are, declination might be only a few degrees. However, over a long enough distance, walking a few degrees off from your target can have you end up completely lost.
So, how do you figure out what declination is? Great question. Declination is a difficult number to calculate by hand since it depends on time and location. Fortunately, there are two ways to find your local declination:
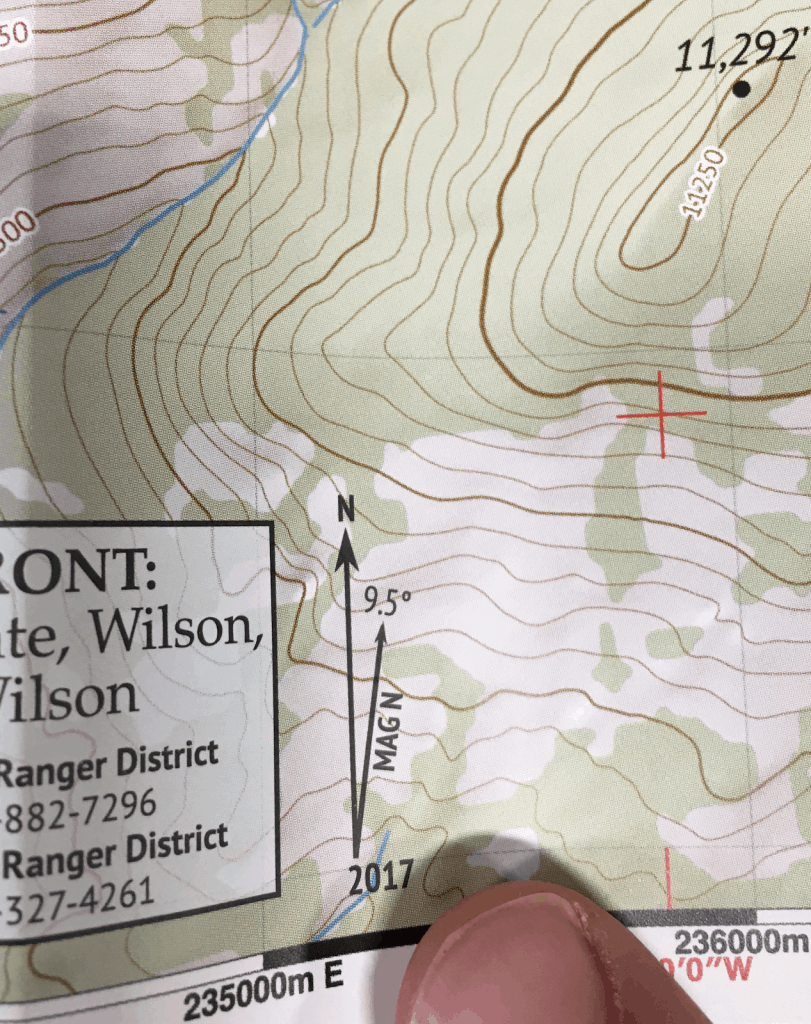
- Topographical Map – in the border or corner, declination is usually denoted by a small angle, like this (here is how to read one):
- Internet – this page from the National Oceanic & Atmospheric Administration will calculate your declination based on your location and date. All you have to do is insert your city on the right and press Calculate on the left. Your declination will pop up in seconds.
Now that you have your declination, time to plug it into your compass.
Adjusting declination is actually the most natural part. Every compass is different, but most have a switch or button that allows you to turn the azimuth ring to adjust for declination. Consult your compass' instruction manual to double-check.
Fun fact: declination is roughly zero along Alabama, Illinois, and Wisconsin. That's where magnetic north is directly north. So, anywhere west of Alabama will have an eastern declination, and anywhere east of Wisconsin will have a western declination.
"But My Compass Doesn't Have Adjustable Declination!"
First of all, you should definitely get one. Upgrading to a compass with adjustable declination won't break the bank in any way, shape, or form.
Second of all, don't worry if you're stuck with a non-adjustable compass. You can still adjust for declination, it just takes a little bit of thought.
- Determine your local declination using the resources mentioned previously.
- Look at your map and figure out your bearing.
- Add the declination degree to the angle you found on your map (remember, east declination is positive, and west is negative).
- Take that direction, find it on your compass, and start trekkin'.
For example let's say you're in beautiful Cheyenne, Wyoming.
You go to NOAA and find that the declination is 8°. You open your map and decide to head 90°. Instead of going 90°, you're going to head 98° to adjust for declination.
Simple, right?
Although adjusting for declination is easy, it's just another thing to think about. In an emergency situation, you want to be thinking about as little as possible. That's why it's so worthwhile to have a compass with built-in declination.
Just set it and forget it.
Using A Compass To Orient Your Path
There are a few ways to use a compass to help you stay on the right path when you're out hiking.
The most basic is when you get to a fork in the road. Open up your map and decide which trail you want to take. Use your compass on your map to determine what angle the path points, then head in that direction.
You can also simply face due north and look at the map. This is an easy way for you to see which way is which when you come to a fork.
If you're not at a fork, you can still use your compass to find your way. This tip is especially helpful if you're off the trail and digging through the woods.
- Mark your current position. If you don't know where you are, read the section below.
- Mark your goal.
- Draw a straight line between the two points drawn.
- Measure what direction the line points.
- Twist your orienting ring on your compass until the arrow points where you need to go.
Now, whenever "red's in the shed," your directional arrow points towards your target, no matter where you go on the trail.
Here's how it's done:
Using A Compass To Find Your Location
All of this navigation stuff is good and well, but how do you find your location if you get lost? Your first instinct might be to pull out your trusty iPhone to have a look on Google Maps.
But, if you're deep in the woods, you won't have service, so that's where a map comes in.
Fortunately, there's an easy way to find your location on a map using triangulation. Here's how.
- Head to a clearing, summit, or really any place that gives you full visibility.
- Open your map and find prominent landmarks near where you think you are. Ideally choose three landmarks (like a big rock, a lake, or another mountain summit).
- With your eyes, confirm that you can see the landmarks.
- Using your compass, take a bearing, and determine what direction the landmark is to you.
- On your map, draw a line from the landmark using the angle you found in step #4.
- Repeat steps 4 and 5 with the other two landmarks.
At this point, you should have a small triangle where the three lines intersect. That's where you are!
Depending on how accurate your bearings are, the triangle will be smaller or larger. Perfect readings will give you a dot on the map, while shoddy measurements will create a wide triangle.
What To Look For In A Compass
Whew. That was a lot of instructions! I bet you're chomping at the bit to get out there and start forging your path.
But, maybe you don't have a compass yet. That's fine. I understand that we usually rely on Siri to get us to our destination.
So, if you're looking for a compass, here's what to look for.
- Simple – Contrary to popular belief, your compass doesn't need all the latest bells and whistles. User-friendly is the name of the game here.
- Affordable – Similarly, buying a compass shouldn't require you to take out a new mortgage. Compasses are simple tools and can be purchased at a low price.
- Reliable – If you get lost, you can't afford to have a compass that points you in the wrong direction. Pick up a compass that'll last for years, not some $3 compass that breaks after one use.
- Declination Adjustment – You already know I'm gonna say it, but get a compass with declination adjustment. It might cost a few dollars more, but a compass is something you can theoretically buy for life. Buy one that has this crucial feature so you can be prepared for years to come.
Here are all of our current hiking compass recommendations.
Conclusion
People have been using compasses for centuries, and it's obvious why. There's no tool as significant for helping you find your way when you're out in the wild.
When you consider how lightweight a compass is (and the fact that it doesn't need batteries), packing one should be at the top of your list of priorities. Even if you're new to the hiking & outdoors world, you never know when you'll need it.
By now, you've learned how to use a compass to do a couple of different things. You know how to identify yourself on a map, find your bearings, and locate true north.
With that, you're ready to hit the trails and soak up the wilderness.
Enjoy!